

Bee Built Hive Assembly Instructions
Top Bar Hive
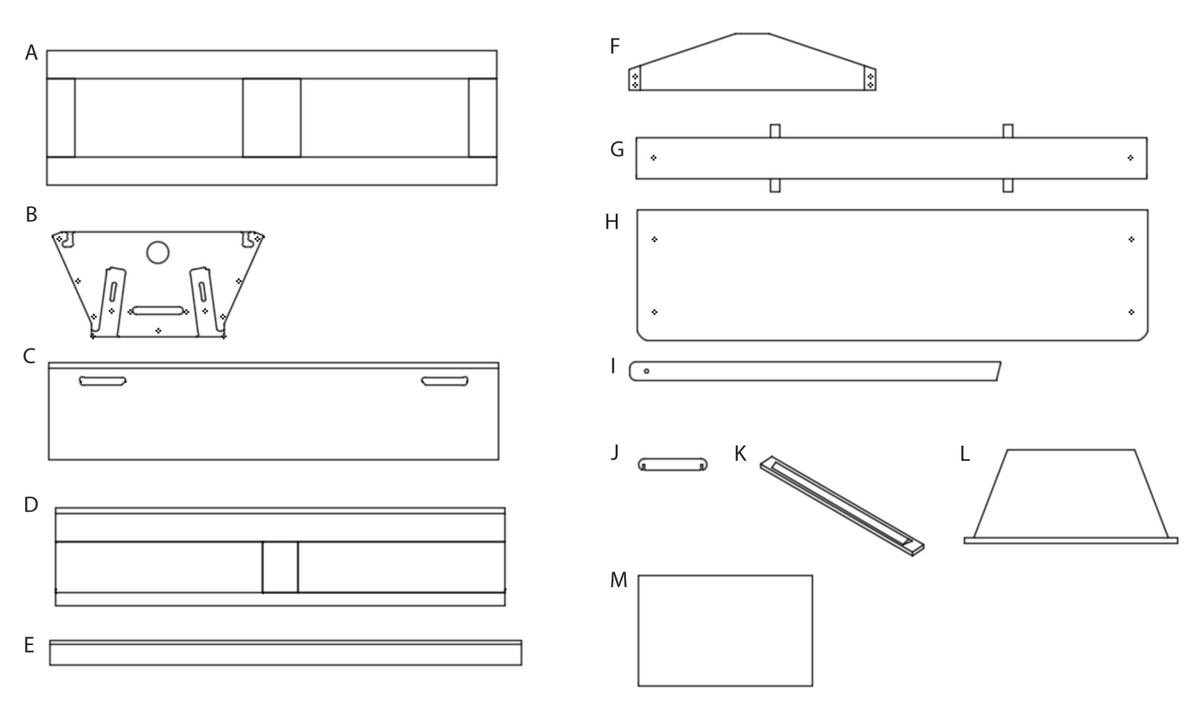
Hive Kit
Note: Windowless hives include a second Side Wall instead of part D.
- A (1) Base
- B (2) Hive Ends
- C (1) Side Wall
- D (1) Side Wall With Window
- E (2) Roof Sides
- F (2) Roof Ends
- G (1) Ridge Cap
- H (2) Roof Panels
- I (4) Legs
- J (3) Bee Access Covers
- K (28) Top Bars
- L (1) Divider Board
- M (2) Solid Bottom Boards

Before You Begin
For each step, it is important to make sure you are screwing into each surface following the pre-drilled holes. This will ensure a strong connection and a clean finish.
Step 1 - Figure 1 to 4
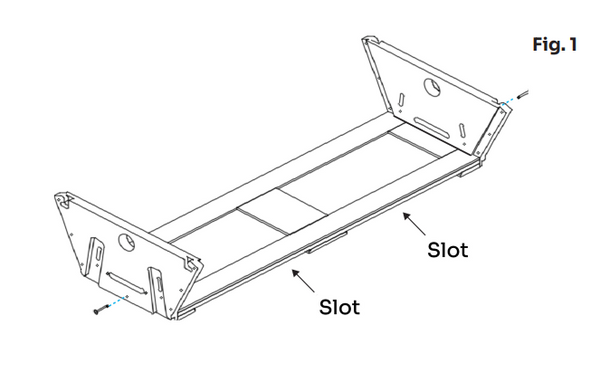
Place the Base (A) slot-side down on a flat surface then start a Medium Screw (B) into the Hive End (B). Center the Hive End (B) over the Base and finish drilling in the screw.
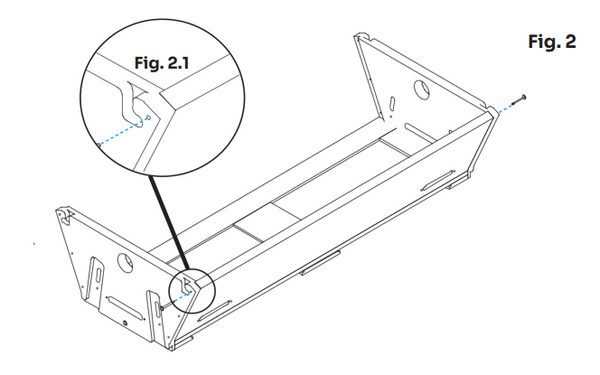
Place the Side Wall (C)on the Base on the side with the slots on the Base (A). Using a Medium Screw (B)and ensuring the top of the wall is aligned with the Hive Ends (B), attach the Hive End (B)to the Side Wall (C).
Note: A gap at the bottom is fine, but a gap at the top is not.
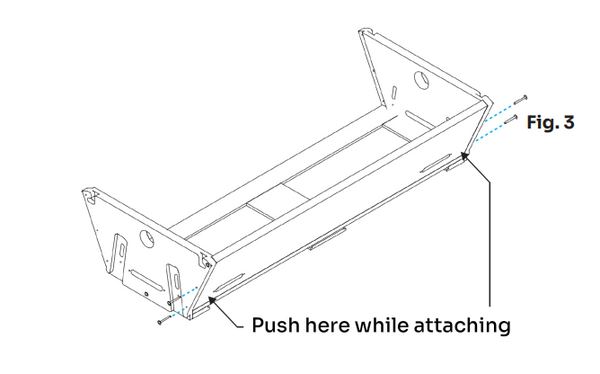
Attach a Medium Screw (B) through the bottom hole of the Hive End (B), making sure the Side Wall (C) is pushed tight against the Hive End (B).
Finish by screwing a Medium Screw (B) into the middle hole.
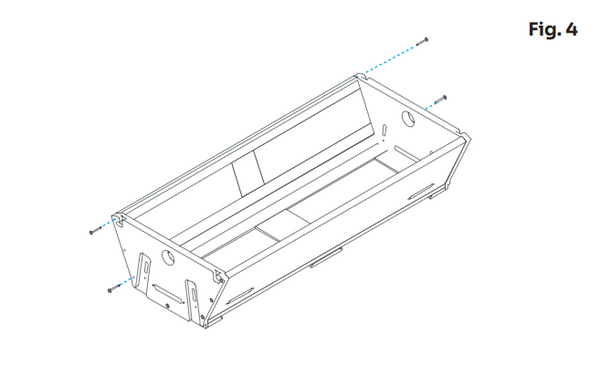
Place the Side Wall With Window (D) on the other side and repeat the same process but DO NOT screw into the middle hole on the Hive End (B) or you will not be able to remove the window cover.
Note: If your hive is windowless, repeat this step with Side Wall (C).
Step 2 - Figure 5 to 8
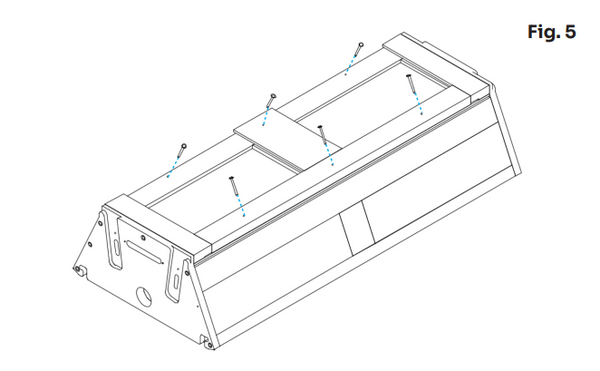
Turn over the hive assembly and drill in 6 Long Screws (C) to connect the Base (A) to the Side Walls (C and D).
Be careful when screwing to follow the angle of the pre-drilled holes which is the same angle as the walls.
Set the Hive Body Assembly aside.
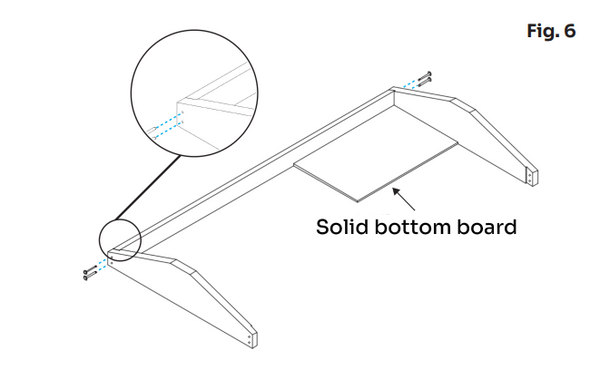
Lay out the Roof Sides (E) and the Roof End (F) making sure the slope on the top of the Roof Sides (E) matches the slope on the Roof End (F).
Place the Solid Bottom Board (M) at each inside corner temporarily before to attach the parts to ensure the sides and ends are at a 90˚ angle to each other.
Using Medium Screws (B) connect the Roof Sides (E) to a Roof End (F).
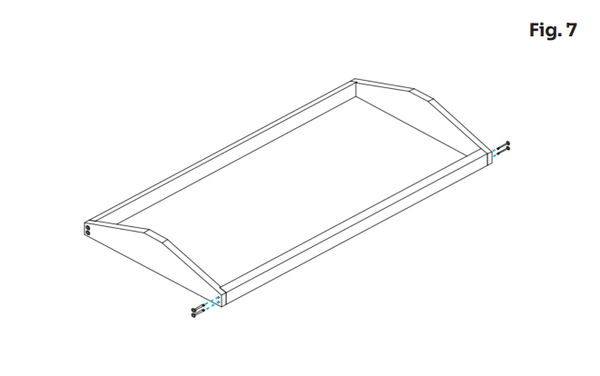
Using Medium Screws (B)once again, screw in the other Roof Side (E).
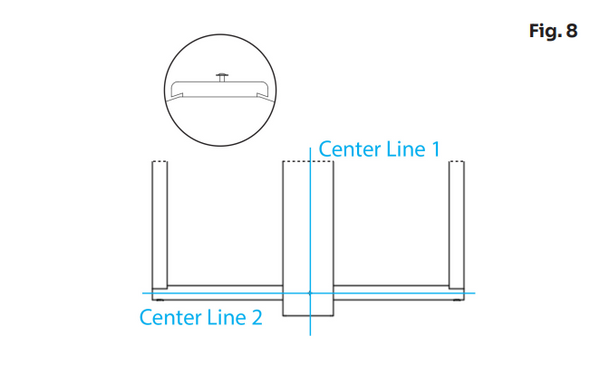
Looking from above, center the Ridge Cap (G) over the Roof End (F), as seen in Figure 8 on Center Line 1 and Center Line 2.
Attach the Ridge Cap (G) to the Roof End (F) with a Medium Screw (B), but do not screw it all the way, leaving it about a quarter of an inch above the Ridge Cap (G) to allow for the next step.
Step 3 - Figure 8 to 12
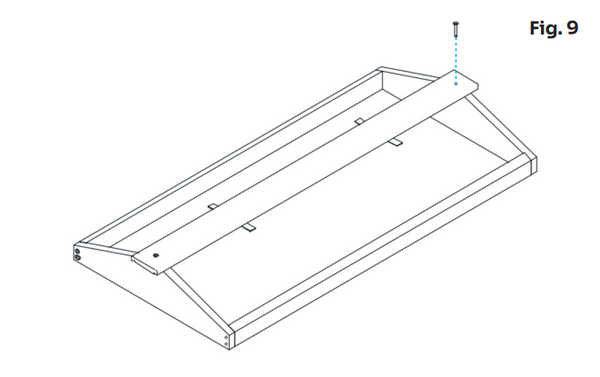
Center the other side of the Ridge Cap (G) on Center Line 1 and Center Line 2 to the other Roof End (F).
Attach the Ridge Cap (G) to the other Roof End (F) with a Medium Screw (B), again leaving it about a quarter of an inch above the Ridge Cap (G).
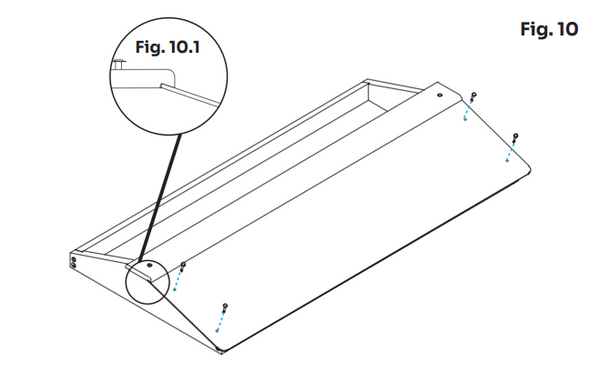
Insert the Roof Panel (H) on top of the spring steel then slide it up and under the Ridge Cap (G) until it is snug against the top of the Roof End (F) and up under the Ridge Cap (G) (see Figure 10.1).
Holding the roof panels (It’s helpful to have one person hold the panel and another person attached the roofs) screw in 4 Short Screws (A) ensuring they go in 90˚ to the Roof Panel (H).
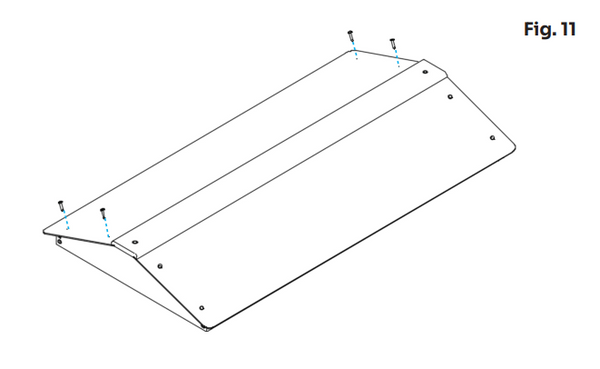
Repeat the same process for the other Roof Panel (H). Then fully tighten both screws on the Ridge Cap (G).
Set the Roof Assembly aside.
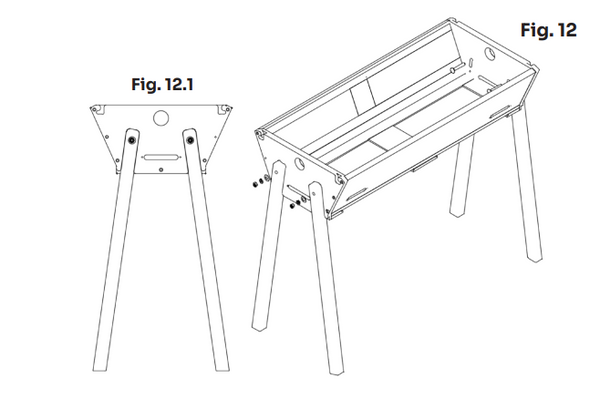
Attach the Legs (I) by first placing the Hive body on a table at least 3 feet tall. Insert one Leg (I) into the outer slot on the Hive End (A) making sure the angle on the bottom of the leg is parallel with the ground below.
Insert a Carriage Bolt (D) from the inside of the Hive End (A) and through the Leg (I).
Secure Bolt (D) on the outside by first placing a Flat Washer (E) then a Lock Washer (F) and then a Hex Nut (G) on the bold. Secure it finger-tight. Repeat the same steps for the other three legs.
Step 4 - Figure 13 to 15
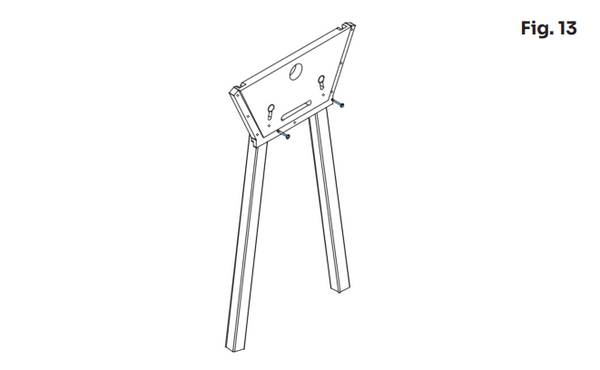
To level the Hive, place in the location where you are going to site the hive. Loosen the nuts of any legs not touching the ground one at a time and lower each leg until it touches the ground, and then tighten the nuts with a wrench or a pliers.
Lock legs in place by drilling Medium Screws (B) through the holes on the inside of the Hive End (A).
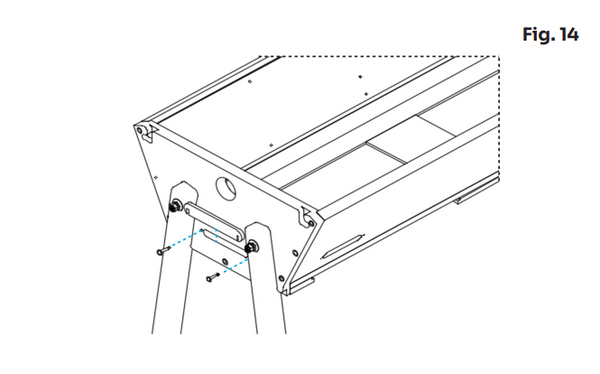
Choose where you want your bees to enter and exit the hive. We recommend openings away from people and in the bees’ flight path.
Close off the other openings by drilling in 2 Short Screws (A) leaving them un-screwed about 1/2 inch.
Sliding the slots in the Bee Access Cover (J) over the screws and then secure the screw lightly against the Bee Access Cover (J).
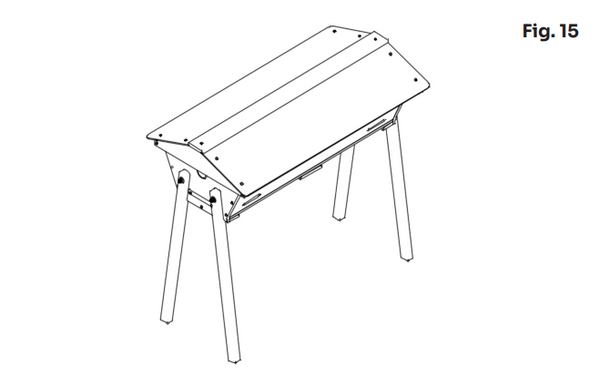
Place the Roof Assembly on Hive Body Assembly by aligning nubbins on the underside of the Roof Assembly with the slots on the top of the Hive Ends (B).
The roof should now be able to hinge open in either direction.
Step 5 - Figure 16 to 17
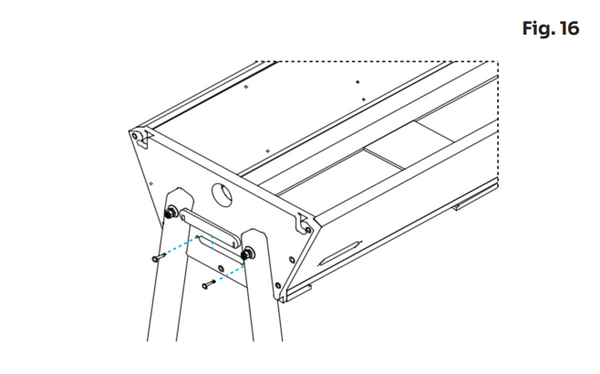
Open the Roof and insert Louvers (H) in the hole on the outside of the Hive Ends (B).
Starting and the end of the hive where you have your bee access open, insert as many Top Bars (L) as you want.
Finally, insert the Divider Board (K) snug up against the last Top Bar (L) you insert.
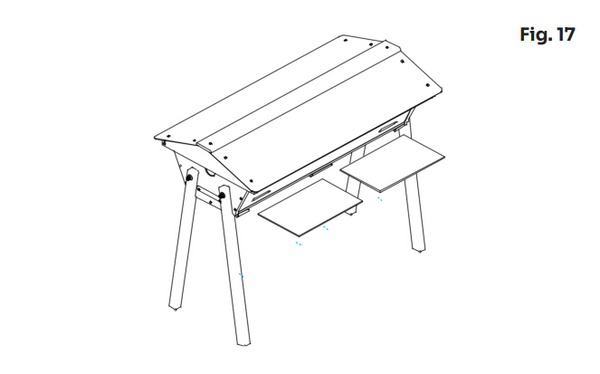
The bottom of your Top Bar Hive is equipped with stainless steel screened bottoms.
Decide whether you want to use the screened bottom or whether you want to insert the Solid Bottom Boards (M) to make a solid bottom hive.
The screen bottom is nice for warm weather. When things get cold and drafty, you may want to convert to a Solid Bottom.
Warre Hive
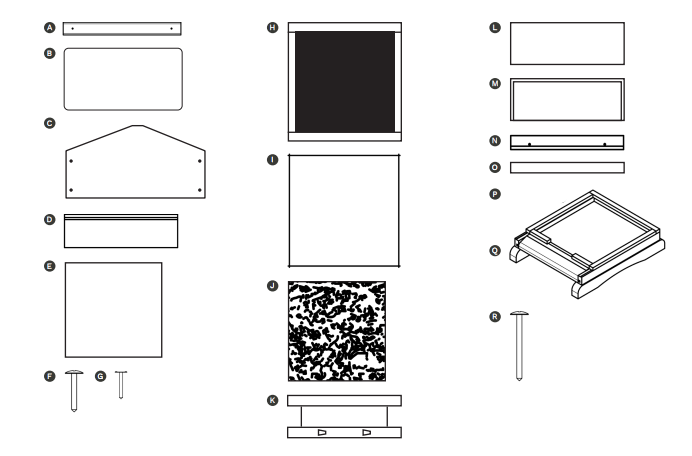
- A (1) Ridge Cap
- B (2) Aluminum Panels
- C (2) Peaked Roof Ends
- D (2) Roof Sides
- E (1) Plywood Roof Floor Insert
- F (30) 1½" Screws
- G (12) 1" Screws
- H (1) Assembled Quilt Box w/ Canvas
- I (1) Small Canvas
- J (1) Pad of Natural Hemp Insulation
- K (2) Window Assemblies
- L (4) Box Sides
- M (2) Box Backs
- N (4) Handles
- O (16) Top Bars
- P (1) Assembled Screened Base
- Q (2) Feet
- R (12) 2½" Screws
Estimated Assembly Time: 1 Hour
Assembly Questions? Customer Service is available at hello@beebuilt.com
Before You Begin
For each step, it is important to make sure you are screwing into each surface following the pre-drilled holes. This will ensure a strong connection and a clean finish.
Step 1 - A BeeBuilt Composite Aluminum Roof
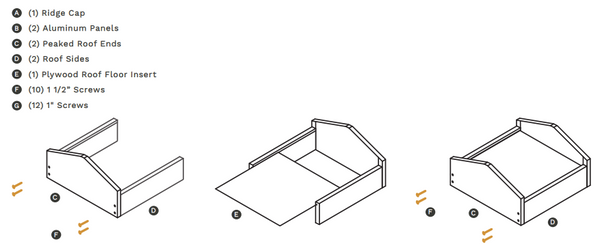
Attach the two Roof Sides (D) to one Peaked Roof End (C) with four 1 1/2" screws. Make sure the grooves on the inside of all three pieces are aligned.
Slide the Plywood Roof Floor Insert (E) into the grooves. If you are having trouble, set the assembly up on its end so you can slide the insert down vertically into the grooves.
Attach the second Peaked Roof End (C) to the other end of the Roof Sides (D) with four 1 1/2" screws. The insert should still fit neatly in the grooves all the way around.
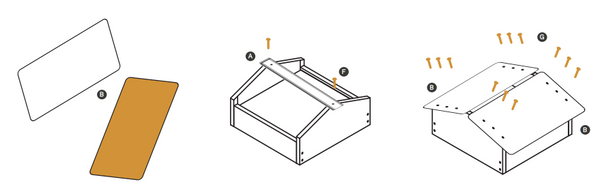
Decide which side of the reversible Aluminum Panels (B) you want to face up. The dark colored side attracts heat (Winter) and the light colored side reflects heat (Summer). You can reverse the panels and use opposite sides at any time.
Place the assembly on a flat surface with the peaks up and place the Ridge Cap (A) on the top of the two Peaked Roof Ends (C) and center the Ridge Cap. Attach the Ridge Cap with two 1 1/2" screws to the two Peaked Roof Ends, but don't tighten the screws all the way down (leave about 1/8").
Slide one of the Aluminum Panels (B) up under the Ridge Cap (A) and attach with six 1" screws through the holes pre-drilled in the panels. Slide the other Aluminum Panel (B) up under the Ridge Cap and attach with six 1" screws. Tighten down the Ridge Cap snug against the top of the panels to finish the roof.
Step 2 - Quilt Box and Hive Box
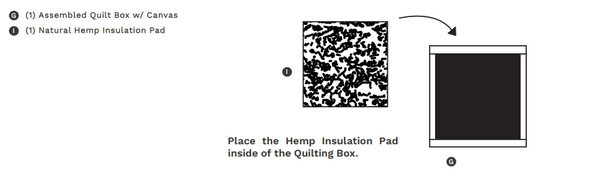
Place the Hemp Insulation Pad inside of the Quilting Box.
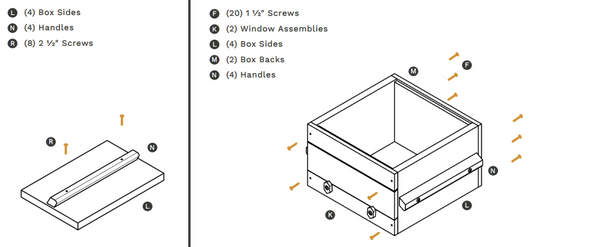
Attach one Handle (N) to each Box Side (L) with two 2 1/2" screws for each Handle. You will do this four times. Be sure to attach the Handle at the same position each time.
Next build two identical windowed hive boxes. Take one Window Assembly (K) and two Box Sides (L) and place them on a table with the handles sloping downward for ease of lifting and better rain runoff. Next attach the Window Assembly and two Box Sides with four 1 1/2" screws through the holes pre-drilled in the Window Assembly. Next attach the Box Back (M) to the other end of the Box Sides (L) with six 1 1/2" screws. Repeat to build the second hive box.
Step 3 - Finishing Ups
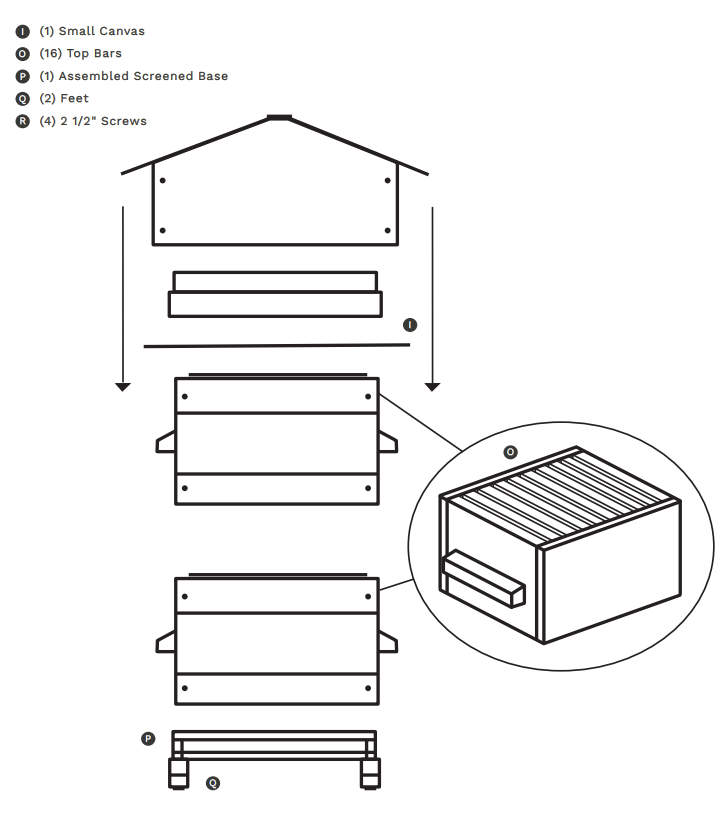
Set the Assembled Screened Base (P) upside down on a table. Use four 2½" screws to attach two Feet (Q) with the arched side facing upward.
Place the first hive box on the Assembled Screen Base (P). Evenly space eight Top Bars (O) into the top of the first hive box, flat sides up. You can use a Warre Hive Spacing Tool for this if you have one.
Next stack the second hive box on top of the first and repeat the process of adding eight Top Bars (O) and evenly spacing them.
Place the Small Canvas Sheet (I) on top of the second hive box. Now put the Quilt Box on top of the Small Canvas Sheet. Lastly, set the assembled roof on top and over the Quilt Box, hiding it.
Once your hive is fully assembled, we recommend using 100% Tung Oil as a natural sealant. Tung Oil takes time to dry and can be messy. For best results we recommend sealing your hive prior to any extended outside exposure. Make sure to wait until the hive is FULLY assembled, and only apply Tung Oil to EXTERNAL surfaces. Never use Tung Oil anywhere inside the hive boxes, between hive boxes, or on the Top Bars as the smell from getting any Tung Oil inside the hive or joints could make your bees flee!
You can also download our BeeBuilt Hive assembly instructions in PDF format.
Built for bees. Made for you.
Learn about keeping bees in your new Bee Built Top Bar Hive.