

The Most Important Things to Consider When Building Your Own Top Bar Hive
This season we think everyone should be out there beekeeping. Whether you're in it to help your community by supporting pollination, to enjoy the exciting experience of working with nature, or just to get some honey for your morning tea, one of the most accessible methods is to use a “top bar” hive. If you want to participate in a centuries-old, worldwide tradition, save yourself the backache that can come from lugging around heavy Langstroth and Warre hive boxes, and enjoy easy inspections that are less disruptive to your colonies, the top bar hive method might be for you.

Building your own top bar hive is a popular option. You can find plans all over the internet. In this article though, we want to show you what we have learned over the years and why we think our method will give you and your bees the best experience you can get.
We have been building and using top bar hives for a long time in our apiary at Bee Built, and we have also been listening to feedback from top bar hive beekeepers as we refine our designs. If you want to use our plans, they are available as a PDF (currently on sale for $10!), and you can also buy optional top bars and hardware kits from us. Wherever you get your plans, hardware, and wood, you’re in for a fun DIY experience.
Let's take a look at what goes into a top bar hive, and what you'll need. Here’s an exploded picture of all the parts. It may look like a lot, but if you have any skills with a saw, it’s actually pretty easy to put it all together.

**Please bear in mind that this is a woodworking project involving the use of power tools that require safety gear and protocols. If you have little woodworking experience, we recommend taking a course or having an experienced mentor help you and recommend that you NOT try to build this on your own.**
Tools you’ll likely need
Table saw or circular saw
Miter or chop saw
Power drill
Hole saw bit (1-2")
Drill bits
Wood clamps
These are just recommendations. As long as you end up with boards cut to the right size, you'll be in good shape.

Hardware
Any well made hardware will suffice, but you can always order our hardware along with our PDF plans if you want to be sure of quality and fit. Regardless, here is the list of hardware you will need:
50 - 2" #8 Screws (58 with stand). We recommend you NOT use drywall screws, but use construction screws.
10 - 1/2" screws
2 - 2½" x 3/8" Bolts
2 - 3/8" Nuts
4 - 3/8" Washers
2 - 1/2" by 3/8" Bushings (only for hinging, removable roof)
2 - Hinges
3 - 2" Bungs (sized to match the entrance holes)
3 - 1" Corks (sized to match the ventilation holes)
1 - 41⅞" x 67/16" Plexiglass (optional)
1 - 2" x 6" 1/8" hardware cloth or screen (aluminum or other metal)
Lumber
When it comes to lumber, the kind you'll need varies a lot depending on the part of the hive you're building. The hive body and top bars are where the bees will be living and working, so these need to be high quality. The roof and legs, on the other hand, are where you have opportunities to save on costs.
Recommended woods you can use for your hive body and top bars:
- Western red cedar
- Eastern white cedar
- Juniper (though wide boards can be hard to find)
- Cyprus
- Douglas fir (though can be a bit heavy)
- Eucalyptus
- Pine
Woods to avoid for your hive body and top bars:
- Pressure treated lumber
- Plywood

We use “clear” lumber in our premium hives, with no visible knots. #2 lumber, with tight knots only, could work well for a DIY project and save you some money. We do not recommend using #3 or lower quality lumber, as the looser knots may eventually turn into holes during the life of your hive.
The Broad Strokes
Now let's take a look at our best recommendations from our experience.
- Your hive body will need to be at least 42" long, as we have found this gives the bees the space they need to thrive.
- In order to manage this space effectively, you will want to have two dividers inside. These dividers look like top bars from above, but are solid pieces of wood that extend to the bottom board of the hive and contain the colony. Placing one between the first top bar and the wall will allow for easy inspection of the brood nest and comb formation. Placing the other divider after the last top bar will allow you to add more space as the bees need it, and remove space for the winter, if necessary.
- Side entrances will need to go at one end of the hive, never in the middle, or else the colony may start putting honey stores at each end of the hive and end up starving in the winter, being unable to reach both ends.
-
You have a lot of options for creating the side entrances, but a 2" bung will close a 1 1¹⁵⁄₁₆" hole, and a used wine cork will close a ¾" hole. We also recommend drilling some ventilation holes, which the bees may seal and unseal with propolis as they want more or less ventilation.

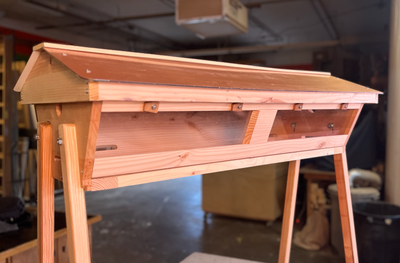
- Every time you open your hive, your colony's productivity stops. It's best to avoid this type of disruption as much as possible. That's why we highly recommend installing a plexiglass viewing window to allow for non-invasive inspections. This window should run the full length of the hive body and can be secured with latches and an optional hinge. As long as the window remains covered when not in use, it will be ok.
- As for the roof, ours are peaked and hinged for aesthetics and ease of use. However, yours doesn't need to be nearly as fancy if you don't want it to be. Something as simple as corrugated plastic or plywood will suffice.
- The same is true of the hive stand. Our design is meant to allow easy removal of the hive body, which will let you move the whole hive relatively easily if you want. If you don't plan to move your hive, though, all you really need is something that will get the body about 36" off the ground so you won't be straining your back or dealing with pests like skunks getting in. Some people affix a couple of wooden boards underneath the hive body lengthwise like "skis" and set the whole thing on cinder blocks.
- Once you’ve got your hive set up, you’ll need to install your bees, of course! Check out our simple how to video:
If all this has you thinking that the top bar hive method sounds pretty good, but working with plans and finding lumber might not be for you, you're in luck! You can get a premium Golden Mean top bar hive from our friends at BackYardHive with minimal assembly required and jump right in. We hope you’re as excited as we are about the possibilities this season holds for beekeeping, and if you do want to give top bar beekeeping a try this season, now is a great opportunity, while our plans are on sale for only $10.
Be sure to let us know about your experiences with top bar beekeeping and DIY beekeeping projects in the comments and connect with us on social media. We’d love to hear from you!
Written by Zak Garland


